Sia

Question
Computer Science
Posted almost 2 years ago
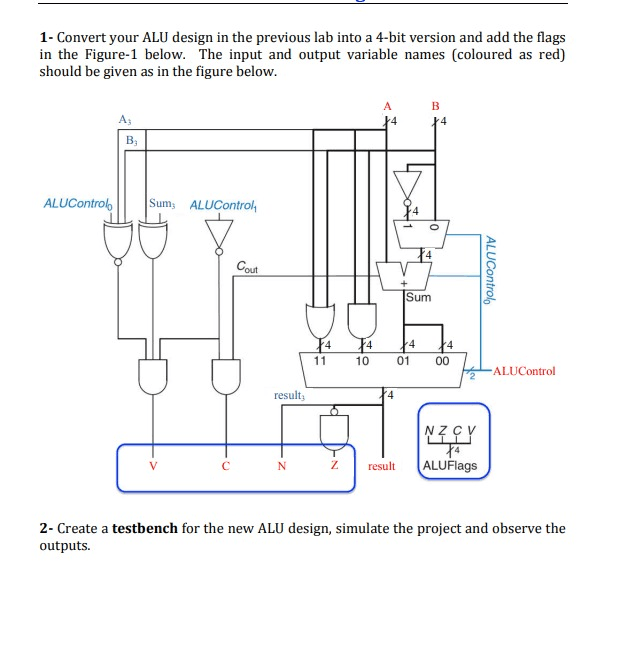
1 - Convert your ALU design in the previous lab into a 4-bit version and add the flags
in the Figure-1 below. The input and output variable names (coloured as red)
should be given as in the figure below.
B
A
A3
4
4
B3
ALUControlo
Sum3 ALUControl
4
4
Cout
+
Sum
4
4
4
4
11
01
00
10
ALUControl
2
4
result3
NZCV
14
Z
C
V
N
result
ALUFlags
2- - Create a testbench for the new ALU design, simulate the project and observe the
outputs.

Answer from Sia
Posted almost 2 years ago
To address your question about converting the ALU design into a 4-bit version, adding flags, and creating a testbench for simulation, let's break it down step-by-step.

 Step 1: Convert ALU Design to 4-bit Version
You need to modify your existing ALU design to handle 4-bit inputs and outputs. Here is a simplified version of a 4-bit ALU in Verilog:
verilog
 Step 2: Create a Testbench
Next, you need to create a testbench to simulate the ALU and observe the outputs. Here is an example testbench in Verilog:
verilog
 Step 3: Simulate and Observe Outputs
Run the simulation using your preferred Verilog simulator (e.g., ModelSim, Vivado) and observe the outputs for each test case.

 Answer Choice
D
Key Concept
4-bit ALU Design and Testbench
Explanation
The 4-bit ALU design includes handling 4-bit inputs and outputs, setting appropriate flags (N, Z, C, V), and the testbench is used to simulate and verify the ALU's functionality.
Not the question you are looking for? Ask here!
Enter question by text
Enter question by image
Unlock Smarter Learning with AskSia Super!
Join Super, our all-in-one AI solution that can greatly improve your learning efficiency.
30% higher accuracy than GPT-4o
Entire learning journey support
The most student-friendly features
Study Other Question